

A live USB lets you start Linux on another computer, but an ordinary session often loses installed applications, settings and files after a reboot. DistroClone USB creates persistent media from a compatible desktop ISO, so you can return to your working environment and carry files in a dedicated Shared folder.
This guide covers version 0.3.1, available on GitHub. It is the graphical companion to distroClone for ISO creation and distroclone-backup for backup and recovery. The interface supports English, Italian, Spanish, French and German.
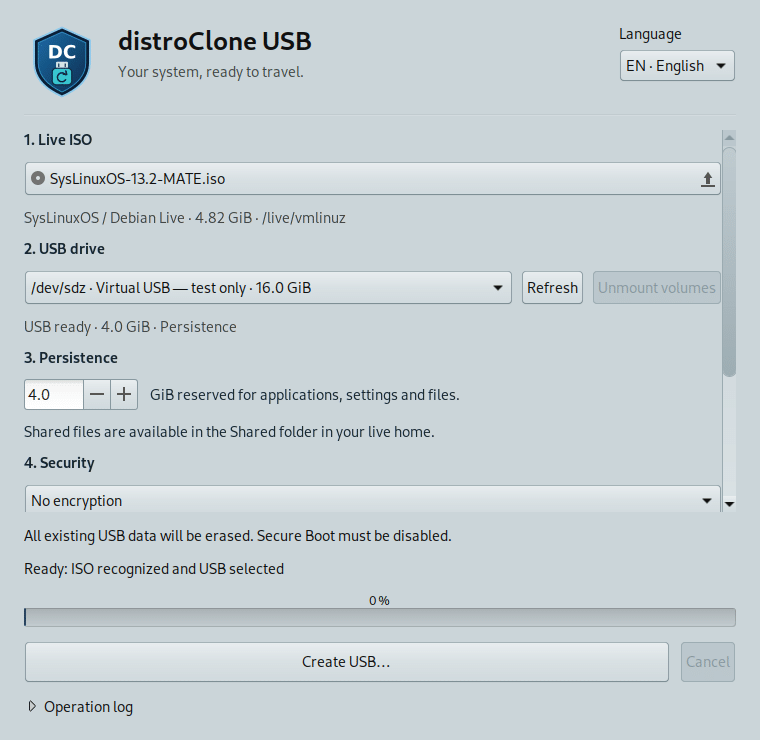
English interface with a SysLinuxOS ISO and a demonstration USB. The /dev/sdz device shown is a test example.
Requirements and compatibility
Create the USB on an amd64 Linux host compatible with the Debian package, with a GTK desktop and a polkit authentication agent. APT installs the required ISO, filesystem, GRUB and encryption tools. Store the input ISO on your computer or another drive, never on the target USB.
SysLinuxOS and Debian Live: compatible live-boot images; documented verification covers SysLinuxOS 13.2 MATE.
Ubuntu desktop and Linux Mint: recognized casper profiles, without encryption; booting real distribution images still needs specific validation.
Boot: Legacy BIOS and unsigned x86-64 UEFI. Secure Boot must be disabled.
Excluded: MX/antiX, installer-only images, Ubuntu Server, ARM and IA32-only UEFI.
The drive must have room for the ISO, boot area and selected persistence space. The application checks capacity before creation.
Install the Debian package
Download distroclone-usb_0.3.1_all.deb from the 0.3.1 release, open a terminal in the download directory and run:
sudo apt update
sudo apt install ./distroclone-usb_0.3.1_all.deb
distroclone-usb
Use APT so the dependencies are installed too. This guide uses the GitHub release download; adding the SysLinuxOS Tools repository is not required.
On SysLinuxOS, open SysLinuxOS Tools → DistroClone USB. Run the window as your normal user. Administrative authentication is requested when the helper needs to write the USB.
Create the USB step by step
1. Live ISO: choose the desktop ISO. Wait for profile detection and review the displayed information.
2. USB drive: select the device explicitly. Check its model, capacity and serial number. Use Refresh after connecting it and Unmount volumes if the desktop has mounted it.
3. Persistence: set the GiB reserved for applications, settings and files. Shared uses this space too.
4. Security: choose an encryption mode and enter and confirm the passphrase when required.
5. Create USB: review the summary, type the exact device name requested and approve the operation in the system authentication dialog.
All existing data on the selected USB is erased. Back it up before proceeding. The application rejects internal drives and devices in use, but checking the selected target remains essential.
The original ISO is copied intact and verified with SHA-256. It is stored on ext4, so files larger than 4 GiB are supported. Wait for completion, then eject the drive through the desktop.
Choose the encryption mode
| Mode | Contents protected at rest | Contents still readable |
|---|---|---|
| No encryption | None | ISO, persistence and Shared |
| Encrypt persistence and shared files | Installed applications, settings, personal files and Shared | Original ISO and boot code |
| Encrypt ISO, persistence and shared files | ISO and persistent/private contents | Minimal BIOS/EFI boot area and configuration |
Encryption requires a compatible Debian Live/SysLinuxOS ISO. The application checks the required initramfs capabilities before writing the drive. Encrypted creation is unavailable for Ubuntu and Mint.
Use a long, unpredictable passphrase of at least 12 characters. Full encryption requires ASCII characters and uses the US keyboard layout during early boot. Letters, digits and spaces reduce keyboard-layout differences. This tool cannot recover your data if you forget the passphrase.
The persistence volume uses LUKS2 with Argon2id. In full mode the ISO volume uses PBKDF2 so GRUB can unlock it. Both volumes share the same passphrase, which matters for resistance to offline attacks. The small boot area stays readable and is not authenticated.
Boot and check persistence
Restart the computer, open the firmware boot menu and choose the USB. GRUB offers persistent, temporary and safe-graphics sessions. Select the persistent session to keep your work.
With persistence-only encryption, Linux requests the passphrase for a persistent boot. Full encryption asks first in GRUB and then in Linux. Three failed attempts at the Linux prompt stop unlocking; reboot to retry.
Create a small file in Shared, change a setting and reboot into the persistent session again. Check that both remain. A persistent live USB is not a full installation: kernel and initramfs upgrades are not guaranteed to take effect after reboot.
Shared: carry files between Linux systems
In a persistent session, Shared is available in the live user’s home and at /Shared. On another Linux system, mount the persistence volume, unlocking it first if encrypted, and copy your files into its Shared directory. Do not put them in the boot area or volume root expecting them to appear in the live home.
Shared uses persistence space; it is not a public FAT/exFAT partition, and Windows cannot read ext4 natively. Do not edit the internal rw, upper or work directories by hand. A temporary session does not expose encrypted persistent Shared.
Cancel creation and reuse a drive
Cancel requests a stop and cleanup of mounted filesystems and encrypted volumes. Wait for cleanup to finish before unplugging the drive. An interrupted USB may be incomplete and must be recreated.
Creation uses quick formatting. It does not overwrite the whole device or sanitize previous data in unused sectors. Encryption protects newly written contents; this operation is not secure erasure. Existing USBs are not converted or encrypted in place while preserving files. Back up your data before recreating the drive.
Read-only commands and troubleshooting
These commands list devices, inspect an ISO, show a plan and check dependencies without writing the USB. Replace the example path and device:
distroclone-usb --list-devices
distroclone-usb --inspect /path/to/live.iso
distroclone-usb --plan /path/to/live.iso --device /dev/sdX --persistence-mib 4096
distroclone-usb --check-dependencies
Drive unavailable: unmount its volumes and check that swap, RAID or device-mapper is not using it.
Insufficient space: reduce persistence or choose a larger drive.
ISO rejected: check its family and structure; select no encryption for Ubuntu/Mint.
USB does not boot: check that Secure Boot is disabled, the firmware selected the USB and the BIOS/UEFI mode is compatible.
Files disappear: choose the persistent session and use Shared for files transferred from another Linux system.
Downloads and documentation
Repository and source code
Release 0.3.1: Debian package, source archive and SHA256SUMS
ISO compatibility
Shared and encryption details
Distributed under GPL-3.0-or-later. Code and original logo: Franco Conidi.
DistroClone USB persistent live USB sharing and encryption